
Freitag, 8. Juni 2012
Montag, 4. Juni 2012
Module 2, chapter 13
Picture 91 shows the Holbein stitch. You can see the technic of this stitch. Piczure 92 is a sampler from this stitch.

Hans Holbein the Younger was born in Augsburg in Germany and travelled in 1526 to England. His pictures of Anne Boleyn are world famous. He produced not only portraits but also designs for juwellery and otther precious opbjects. On his paintings you can see the exact reproduction of the beautiful stitching dresses.(93)
Blackwork is marked by tendernes and retention. The English poet Chaucer mentioned this technic in his Canterbury Tales. Also Catharina Aragon made the blackwork popular at her time.


Image 94 is an example of black work.
Bridget Riley was born 1931 in EnglandIn 1960 she worked in black and white and she envolved a style in which she explored that two dynamic dimensional effects appear as three dimensional. She belonged to the Op-Art artists. The Op-Art style followed the Pap-Art style.


The dynamic impressen results by using lines which run from thick to thin in geometric order by using contrasting colours.
Our own choose artist is Victor Vasarely. He was born in 1906 in Hungary. He lived the most time of his life in France. He worked as a grafic artist. He developed the geometric abstract art. He worked with optical, dynamic, moving impressions. With this technic he produced optical illusions. His designs with lines make the impression of animal fur patterns.
The whole module based on playing with black and white lines to make two and three dimensional patterns like Vasarely and Riley.


Picture 91 shows the Holbein stitch. You can see the technic of this stitch. Piczure 92 is a sampler from this stitch.
 |

Hans Holbein the Younger was born in Augsburg in Germany and travelled in 1526 to England. His pictures of Anne Boleyn are world famous. He produced not only portraits but also designs for juwellery and otther precious opbjects. On his paintings you can see the exact reproduction of the beautiful stitching dresses.(93)
Blackwork is marked by tendernes and retention. The English poet Chaucer mentioned this technic in his Canterbury Tales. Also Catharina Aragon made the blackwork popular at her time.


Image 94 is an example of black work.
Bridget Riley was born 1931 in EnglandIn 1960 she worked in black and white and she envolved a style in which she explored that two dynamic dimensional effects appear as three dimensional. She belonged to the Op-Art artists. The Op-Art style followed the Pap-Art style.


The dynamic impressen results by using lines which run from thick to thin in geometric order by using contrasting colours.
Our own choose artist is Victor Vasarely. He was born in 1906 in Hungary. He lived the most time of his life in France. He worked as a grafic artist. He developed the geometric abstract art. He worked with optical, dynamic, moving impressions. With this technic he produced optical illusions. His designs with lines make the impression of animal fur patterns.
The whole module based on playing with black and white lines to make two and three dimensional patterns like Vasarely and Riley.


Module 2, chapter 12

The next picture (83) shows two more design for a hat.
Of course there are many possibilities for uppersite of the hat- such as hexagons or a big spiral line. I decide for a technic, which I used in chapter ten. This picture /84) is the beginning of the upper site. These are my painted, stamped, bleached fabrics. I want to make this crazy work with many bump ( thick knotted cord).

The next picture (85) shows many examples for the cylinder. I have made many examples so I have a great selection.

On picture 86 you can see the two parts of the hat. These two parts are sewed by machine. Now I can start with the handstitching to get more integrate pattern and colour. This is for me a great pleasure.

I did many, many stitching, spider stitch of a cut through felt ball, Bullion stitch, fly stitch, knot straight stitch. (87)


After I sewed the two parts of the hat together I did more stitching especially many long Bullion stitch and made the tail with perls and a black tassel. (88,89,90)
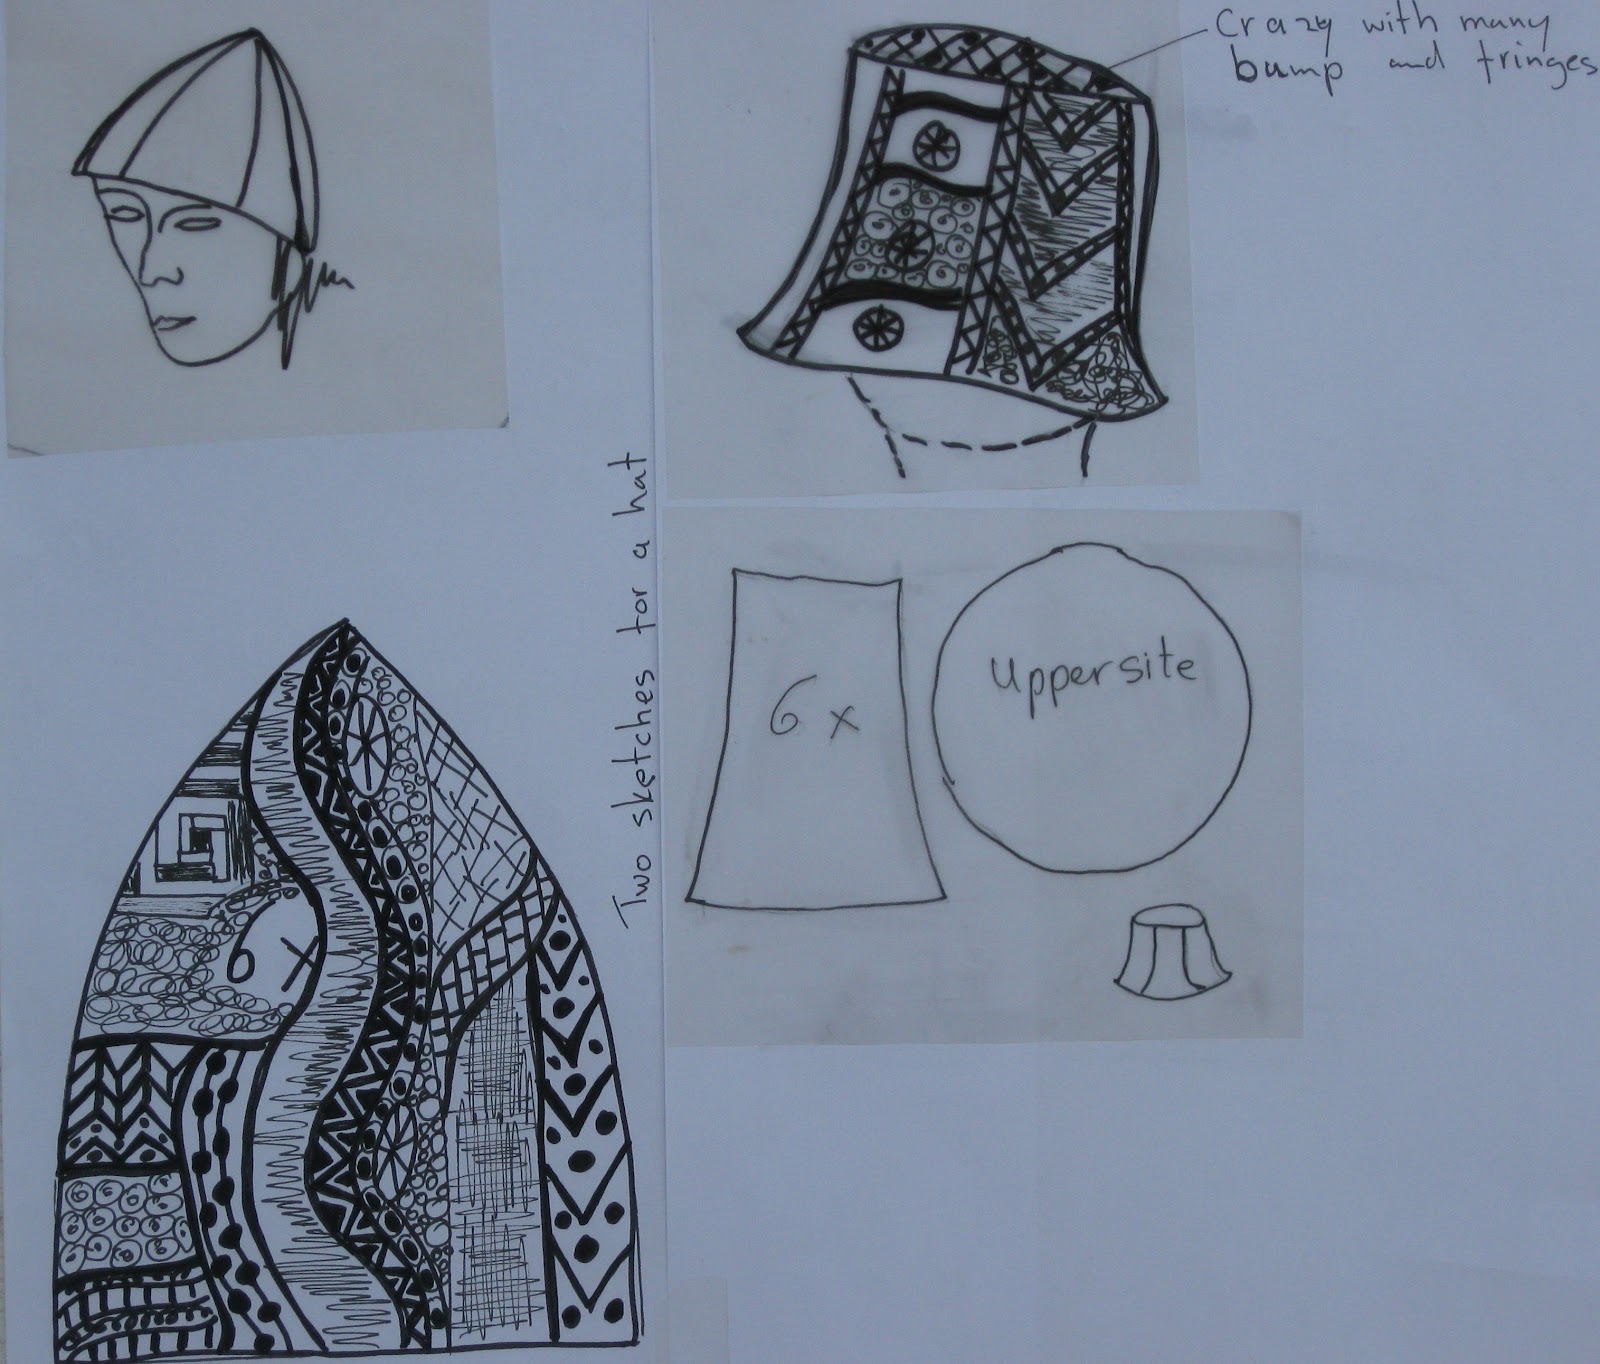
Montag, 30. April 2012

Module 2, chapter 11

Image 68 is a worksheet for further design. It shows my painted and printed papers to make several different patterns.

Image 69: Here are different samples rearranged into different patterns. There are a strong and bold character. One group with dark tones, also one with light tones and a group in gray tones.


Image 70, 71 and 72: Here are samples from different patterns, which are cut up and rearranged in a new pattern.I think it is a little pit stack and whack.

Image 73: This is my worksheet (a triangle, which is cut through) for the next three samples from my paper designs also strack and whack. ( image 74, 75 and 76)


Image 77 and 78: My paper pattern are cut in rectangles and reaarranged.


Image 79: This is a sampler from 8 printed and bleached fabrics with machine stitching lines. They are related with my drawings from my animal patterns in previous chapters.

Image 80: This is a stitched fabric from my stitching samples based on my designs.#

Image 81 is stage B from chapter 11. It shows the three separate sections. The first is the upper side, in the middle I have cut the fabrics only a few times, the lower section is more complex. These are all my stitched samples from image 79.
Module 2, chapter 10, image 65 66 and 67


Here are two samples from paper piecing method of cutting. My drawing lines are the cutting lines.

Image 67 shows mosaic pattern by cutting the fabric in vertical and horizontal and diagonal pieces until my sewing needle is broken. I think the undersection is a wonderful textured lumpy surface.
Mittwoch, 14. März 2012
Module 2, chapter 9, image 54- 64

Image 54 until 64 are the exercises based on the fibonnacci sequence. These are paperstrips arranged in tonal and width order.

This is my pattern paper piece cut into fibonnacci series.I arranged them with a slight gap between each strip.

More strips cut in fibonnacci and than rearranged in a different way.

This is the exercise with one patterned and one plain paper cut up both into strips.I arranged the strips alternatively.

The previous design is cut up into the fibonnacci series.I arranged these strips again on a plain background living gaps between the strips.


This a new fibonnacci block with 5 strips in tonal order.

This is the above block cut up into equal strips and move them alternate.

These are the strips from block 7 to create a square design like log cabin.

This is one of the three starting block to cut up into diagonal strips. I have woven this strips and so I got this pattern.

This image and the next image show two designs of the golden section formular.

Abonnieren
Posts (Atom)