Dienstag, 16. September 2014

Module 6:
During downloading the module 6, I noticed, that the topic of this module is sea and sky. By fortune I have booked a one day journey to Venice in a few days. The content of this study trip was: "The fabrics as dreams are made on". We visited the very famous and old  manufactories : Bevilaqua and Rubelli. These two are famous for their special kind of  silk velvet ( soprarizzo velvet). So I took many fotos from water during the journey.


Picture 1,2 and 3 show water surfaces with reflections, ripples, froth and bubbles.


Picture 4: pollution and reflections

 
Picture 5: waterreflections. The pictures above are taken in Venice.


Picture 6,7 and 8 are pictures our famous "Weissensee". There are interesting colors, textures, reflections and movements.
 
 
Picture 9: weaving reeds by Bevilaqua


Picture 10: silk threads


Picture 11: a piece made in soprarizzo technic by Bevilaqua


Picture 12: pillows by Rubelli in soprarizzo


Picture 13: a fotosampler from water and reflections


Chapter 1
Drawing methods:

Picture 14:
1-14 (numbers on the foto):
     1: Prisma Color- broad and thin, 2: Stabilo, 3: Prisma Color-broad and thin, 4: Neo Color II, 5:     Pastell Jaxell, 6: Derwent inkdense, 7: oil patells, 8: Derwent, 9: Edding 500, 10: gelly pen, 11: Prisma Color, 12: Neo Color, 13: pencil, 14: gel pen


Picture 15:
1-5 (numbers on the foto)
   1: different pencils of Neo Color 2: with Prisma-broad, 2: melted wax- procion, correcture pen and permanent pencil, 3: procion- Prisma broad, gelly pen,- felt pen, 4: stemped with Distress ink, Prisma Color- broad and correcture pen, 5: water soluble oil pastel with a little bit water, Prisma Color- correcture pen.

Picture 16: sgrafitto
First row from left to right:
 First layer: oil pastels, green and the second layer  oil pen stick and than scratched.
 Drops of candle wax and than a thick layer of Neo Color and scratched in this piece.
 The first layer in oil pastel gray the next layer is blue oil pastel and scretched away the gray can not be seen.
 Two layers of hot wax the third layer was done with Neo Color than scratched.
 Two layers of Neo Color by changing the layers.
Second row from left to right.
 Hot wax two layers of oil pastels.
 The first layer green oil pastel the second was wax Crayon and than scratched.
 Oil paint stick iridescant light blue second layer oil paint stick charcoal blue scratched in feather.
 Thin layer oil paint stick and two layers thick oil pastels, scathed in swirl.
 Light blue wax Crayon and a dark blue layer scratched in wavy lines
The results are very different. To scrap away you need a heavy layer of crayon, but the color layers are not always to see.


Drawing with  frottage:
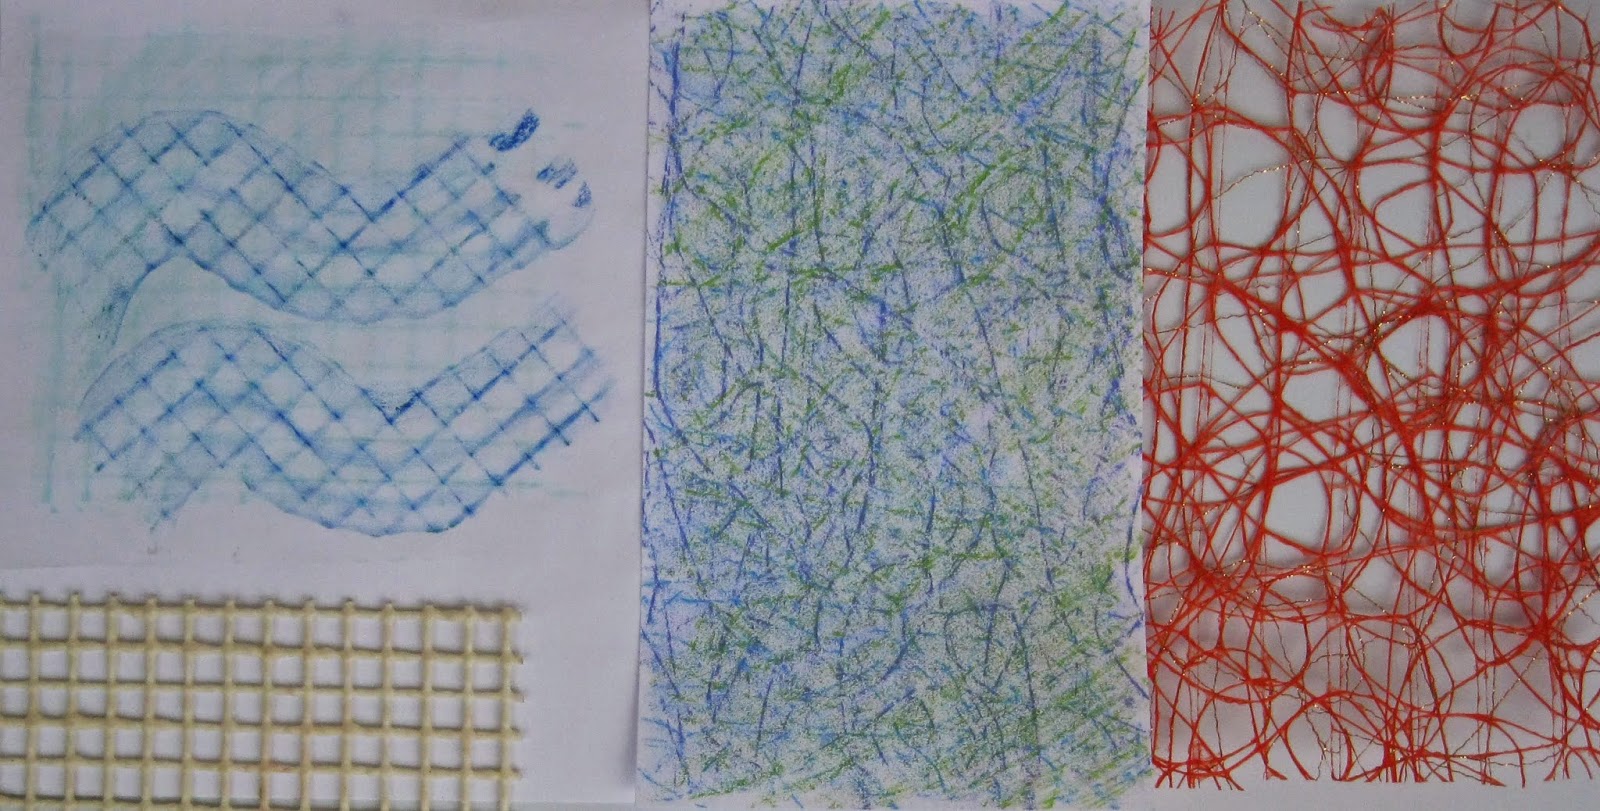
Picture 17:
Left side: frottage on a rubber mat with light blue crayons, straight lines, than wavy lines across the first layer with dark blue made on the side of the crayon.
The next one is made on mesh wire in scribble with Neo Color light blue, sky blue and yellow green.


Picture 18:
Frottage with oil paint sticks in blue.
Frottage with different colors of oil paint sticks in different directions by turning the rubber plate.
Frottage in two diagonal directions with Neo Color.


Picture 19:
Wooden block with paper fastener for rubbing in short lines, long lines and spiralling in blue.
Wire mesh as rubbing by turning in all directions with wax crayons. 
 
 
Resist methods with crayons, ink, discharge and bleach:
 
Picture 20:
Straight lines made by drawing with wax crayons with different colors to make a resist and than a wash with deluded ink.
Oil paint sticks and also a wash with ink.


Picture 21:
Resist with oil pastels and a wash with water color light blue.
Resist with wax crayons a light wash with water color paints, this process was done two times.


Picture 22:
Resist with candle wax and a wash with water color paints (two times).
Resist with candle wax and a wash with water color paints.
In my opinion these two results are the best.
 
 
Picture 23:
From left to right:
Painted with ink and than sprayed with bleach.
First Dilusion Spray and than aply bleach with brush and Pipette.
First Procion and than track lines with my selfmade wooden stick.
Wavy lines again with a brush.


Picture 24:
In these two samples the Basic layer is done by ink and than stemped with bleach. One stamp is self made linol cut, the other is bought.


Transparent surfaces:

Picture 25:
Melted oil sticks on tracing paper, folded, after cool down the tracing paper was opened.
Two layers of plastic sheets with pieces of oil paint sticks and than ironed.
Plastic sheet painted with acrylic and than scratched into the paint.
Tracing paper applied with two colors of acrylic paint in two directions.


Picture 26:
Cellophane sheet covered with drops of melted wax and sprayed with black ink.
Cellophane ironed between two sheets parchment paper and than colored with different blue oil paint sticks.
The following sample is the same only made with one color.


Picture 27:
above:
A sheet of cellophane ironed on a big wooden stemp and than painted with oil paint sticks.
left under:
Bubble wrap was distorted for releasing the air, than painted with oil paint sticks, than covered with a sheet of transparent (bottom right) paper and than these two pieces were ironed.


Chapter 2:
Designing with shapes and layers

Picture 28:

A few samples more from decorated papers in my colorscheme of my fotographs. More methods blue watercolor paint covered with salt and household foil with sponge. Papers with bleach, rubbing, resist and acryl were done in chapter 1.


Picture 29:
The foto shows the reflections of pollutions in the water. I have made a simple drawing.


Picture 30:
I have cut  two different papers ( left site) in wavy lines. Right you can see a piece of plastic. I made this by doing cut out pieces of plastic Shopping bags. These pieces were melted by ironing for glueing them together to demonstrate the water Pollution.


Picture 31:
This Piece of plastic is cut in wavy lines to glue them on paper to see in Picture 30.


Picture 32:
Papershapes identivy to my drawing and Pictures.

Picture 33.
To These two pictures my drawings for later on in this module.


Picture 34:
Another example of drawings of my fotographs.


Picture 35:
A simple drawing for the next paperdesign.


Picture 36:
The first cut shapes with my papers.


Picture 37:
The paper of picture 36 was cut up again and recomposed  new.

Picture 38:
One more drawing.

Picture 39:
Drawing and paper example, done by this fancy scissor.

Chapter 3:
Free machine stitchery:

Picture 40:
This sample is made on my painted callico
From left to right and top down, all little  squares are done by the same cotton sewing yarn, I performed different effects of rhythm such as flowing, crossing, calm and overlapping:
circles, waves, combining of waves, zig-zag and circles, layers of straight stitch, overlapping little circles, overlapping larger circles, meandering, not closed circles, half circles, overlapping only in the middle, loosely straight lines, loosely wavy lines.
The folling eight samples are done by zig-zag stitches: loosely wavy line, loosely straight lines, compact zig-zag rows, rows of big zig-zag overlapping, circle lines, cross over, curves, compact rows of zig-zag stitches and than a second layer of big zig-zags.


Picture 41:
A sample with whip stitch, loose bottom and tighter top tension.
The first eight samples are done by straight stitch.
The following eight patches are done by zig-zag stitch.


Picture 42:
Is a sample with different types of yarns with upside down. I have used cotton thread, silk, lana Madeira, Madeira decore and Sulky metallic.


Picture 43:
This is the backside from my sample above. I find both sides interesting.


Picture 44:
A sample with automatic pattern done by free machine stitching.


Donnerstag, 26. Juni 2014

Chapter 9:
Threads and stitchery:
Picture 38:
A selection of embroidery yarns for the next exercises.


Picture 39:
A sampler with stitches from different categories:
flat stitches: straight, stem, radial, satin in repeated groups, satin different length, twisted satin, thorn, dot or seed in single, double, seed in angles, arrowhead, cross stitch in upright, cross stitch with an upright cross stitch over it, chevron.
looped stitch: button hole with variations in length and distance between the stitches, spaced button hole, knotted button hole, fly stitch, fly stitch crown stitch, loop or centipede stitch, Vandyke stitch, scroll stitch, cretan stitch, cretan stitch one by one alternately by turns, feather stitch: straight, closed, slanted and slanted in variations.


Picture 40:
chained stitches: detached, zigzag, basque, open chain, twisted, wheat ear, raised chain.

knotted stitches: french knot, rotating, bollion knot, long stemmed bullion knot, coral knot, squared palestrina.
composite stitches: laced cretan, whipped chain, interlaced fly stitch, guilloche stitch, raised stem spider web, two parallel rows pikinese stitches.


Picture 41:
Stitch effects:
A sampler of formal stitching rhythm:
from left to right:
linear pattern
separate marks
forming groups with different yarns and gaps
dove tail
variations of size from large to tiny
build up layers of blocks
linear patterns with gaps
couching
cross stitch wrapped


Picture 42:
Informal effects with a stitch:
I have chosen for a straight stitch. To get a rhythm I used a stiff zigzag with a thin and a thicker thread and ad least I created boundaries for more effect.
Loosely stitched curves with different crosses left and right.
Long straight stitches wrapped in single loops.
Straight stitches in circular pattern.
Long crossed  straight  stitches, the crosspoints are detatched.


Picture 43:
Rubbings from my paper reliefs made earlier in this module. I used black and white tissue paper with oil pastel, chalk, pan pastels, Shiva paint stitch, ink and bleach. In the following examples  you can see more ideas about my rubbings.


Chapter 10:
Stitch to translate my rubbings:
Picture 44:
Two rubbings:
One with oil pastel and the other was made of candle wax and than I made a wash with grey water color paints. On the black cotton background I have made  rubbing marks with oil paint sticks. In this exercise I have two patches with these background marks. The other patches have no marks. I used these two technics to show the different types of contrasts ( hard and soft). The stitchery is a thick twisted chain stitch. Afterwards I did overlapping with fly stitch in different sizes and yarns.


Picture 45:
Rubbing with chalk,
The stitch translation was done by using cretan stitch with small organza strips and different yarns.


Picture 46:
Stitched translation of rubbing of gathered tissue paper relief, big sorbello stitch to get a chunky bold effect.


Picture 47:
2 translations  of my rubbings. The black cotton fabric is also rubbed with oil paint sticks. The stitch translation left shows  raised chain bands with thick yarn. On the right site are long straight  organza strips overlapped with chain stitch worked in circles using two different yarns. Several circles have two layers of chain stitches.


Chapter 11:
Use of texture- A
Picture 48:
The following 3 pictures are my decorated papers. I have used ink, paint, stamped with acryl , bleach. Herefore I have made the stamps and linol cuts and rubbings. The picture bellow shows a flat texture paper.


Picture 49:


Picture 50:
This pictures show a selection of raised texture paper.


Chapter 11 B:
Use of shape :
Picture 51, 52 and 53:
In the first step I have taken fotos of the beginning of this chapter. I made different line drawings from these pictures.


In the second step I used my simplified drawings. I ripped my earlier produced papers along the lines of my subdivisions and clued them.

Picture 54, 55, 56, and 57:


Picture 58:
Abstract shapes:
Two samples of my abstract shapes.


Chapter 12:
Stitch trial samplers by using extreme contrasts:
Picture 59 and 60 show my trial samplers translated from my decorated papers.
From left to right: destorted scrim overstitched, a thin layer stretched trikot, snipped yarns, covered with a white chiffon, free hand stitched,  shrinkage was caused by stretching before stitching, knotted strips of felt, hand stitched.


Picture 60:
Three more trial patches:
Left: on black felt I layed down three little white felt strips. Then I have done needle felting to get a soften edge, free hand stitching by machine. overstitched with thin strips of organza.
Upper right: a padded piece of felt. Using different yarns in knot stitch and seed stitch.
Right under: painted bonda web on black felt, stitched with button hole stitch.


Picture 61: Design board- resolved sampler
I am approaching to my resolved sampler. The landscape in my neighborhood with mountains, hills and valleys has an effect on my design in this chapter and on my resolve sampler. There exist extreme contrasts.
On the left side of the picture my paper design with flat and raised areas
In the middle a description of my ideas for the translation in stitchery
On the right side the selection of yarns

 
Picture 62:
left: paper design
right: the stitching result
The next picture shows the result of this module


Detail-Pictures: 


Chapter 13:
 
Study three artists:
Jennie Rayment and Michael Breenand-Wood are two artits, who work with many different kinds of manipulated surfaces  but they have a very different character in their design and execution. Both are well known.
My choice for the third artists are Jan Beany and Jean Littlejohn. These two artists work extremely with studying the nature and landscape. They make beautiful sketch books, especially during their journeys. At home these drawings are the source for their works. They manipulated fabrics in different ways; per example dry felting water soluble fabric, painted bonda web. They have discovered the basic embroidery stitches in many possibilities. They experience in different kind of ways with yarns and fabrics. They are well known all over the world. A workshop with both of them is an absolute highlight.
 
 
Evaluation of completed work:
 
The completed embroidered assessment piece for Module 5 is an imaginary landscape based on the design of paper manipulations.
 
I am satisfied with my result
Especially with the trial patches, it was funny
 
Changes design: In the beginning I had no idea which way I shall go, because I have just started. In progression of the work I get more and more ideas about the special design in this module. Through the hole chapter there are points where you have to decide which way you want to go.
If I had to do it again I would decide for another direction, because I don not want to make it twice.
 
Costing Materials:
nearly all material is from my stock
Astimation: about 20 Euro
 
Timing:
I started on the 12.02.2014 and comleted my work on the first june 2014. The hours of work are 62 hours not included is the time which I needed for fotography, posting the blog, organisation work
(storage of my work and materials, tools and equipment)
 
Health and safety rules:
 
I took care of the safety rules, especially by blaech burning and melting the fabrics.
 
Authenticate my Work:
 
Student Name: Saskia Hetzel
Date: 29.06. 2014
Module 5
The coursework that Saskia Hetzel
is submitting for this Module is her own work
Dr. Heinz Hetzel,  formular is added


Mittwoch, 25. Juni 2014

Chapter 8:
Paper relief into fabric relief
The next 5 pictures show my translation from paper relief into fabric manipulations.

Picture 33, 34, 35, 36, 37
I have used several technics from soft wadded quilting, tucks, small shapes of melted edges with different fabrics, knotted calico strips, stitched to a background, gathered tucks. Every piece is at last stitched by hand. I tried to get different hight on the surfaces.